
记录|小白的个人博客网站部署解决方案
个人网站:观南Gheir | 观南Gheir (epiphany-leon.github.io)
Vitepress + Github Pages,大概11月6日发现的个人博客网站部署平替方案,非常适合小白入门。当然,还是存在一定门槛的,虽然不涉及前端代码,但是整个过程会涉及到markdown、terminal和git的一些操作,而我就是对git一窍不通(尽管我很早就在github上找资源,但是从没想过自己会去发布仓库),导致我花了一天时间才构建完成,期间又是遇到了各种各样的问题。
VitePress
VitePress是一个静态网站生成器,内容使用Markdown语法,配置简单,同时附带了一个默认主题,优点在于依赖本地端口,不需要写前端代码,也可以生成一个静态网站,同时具有更快的速度,配置项足够精简并且可用,使得开发者可以进行快速上手。底层使用Vite和Vue3,前端开发者可方便的进行修改或定制。点击跳转官网
VitePress官方简介
VitePress is a Static Site Generator(SSG) designed for building fast, content-centric websites. In a nutshell, VitePress takes your source content written in Markdown, applies a theme to it, and generates static HTML pages that can be easily deployed anywhere.
注:下文所述的安装过程和版本说明皆参考对应工具的官网和自我经验,相关信息可能会有更新或变动,以官网与实际问题为准。
安装
VitePress可以单独使用,也可以安装到现有项目中。可以使用以下命令行语句进行安装与初始化配置:
# 安装VitePress
npm add -D vitepress
# 初始化VitePress
npx vitepress init
初始化的注意事项
命令行界面会给我们一些问题进行基本项目配置:
┌  Welcome to VitePress!
│
◇  Where should VitePress initialize the config?
│  ./docs
│
◇  Site title:
│  My Awesome Project
│
◇  Site description:
│  A VitePress Site
│
◆  Theme:
│  ● Default Theme (Out of the box, good-looking docs)
│  ○ Default Theme + Customization
│  ○ Custom Theme
└- 严格遵守官方的提示步骤与回答格式,不然小白(就是我)之后会对它的文档路径存在疑惑,自缚手脚;
- 官网上在这之后给了很多解释地部分,建议小白仔细阅读,理解VitePress的文件结构,有助于理解它的实现过程;
- 网络上很多教程时效性不够,官网已经尽可能地简化了所有步骤,很多配置文件是直接帮助生成的,开发者只需要确认文件是否存在以及内容是否正确即可。因此现阶段实验下来,非常适合小白入手。
本地运行
命令行界面键入以下命令分别实现对应功能:
# 开发模式启动
npm run docs:dev
# 手动构建
npm run docs:build
# 预览构建成果
npm run docs:preview
把命令行中出现的网址复制到浏览器中,即可预览效果。Mac直接Command+Click可跳转至默认浏览器预览。
个性化
个性化部分就不赘述,可以自己去开发一下,蛮有趣的哈哈~
撰写文章
这一部分没有什么好讲的,哪怕纯粹的文字编辑也是可以完成的,而我的文章基本上都是文字居多,Markdown就非常适合我的整理习惯。
加之我平常使用Typora记录课堂笔记、头脑风暴等等,目前还在使用Obsidian构建自己的知识体系。并且,不觉得Markdown语法比Python等编程类语言简单多了嘛,几乎没有上手难度的嘛(你就说对不对吧)。
因此,这一块唯一能讲的就是,有些人习惯利用命令行创建文件,然后在VSCode里编辑,我习惯先单独创建md文件然后复制文件到根目录下进行文件链接等方面的编辑。视个人习惯而定。
部署
依据官网指南,需要具备以下前提:
- VitePress网站位于您项目的
docs目录中; - 使用的默认构建输出目录为:
.vitepress/dist; - VitePress是作为本地依赖项安装到项目中的,并且您在
package.json中设置了以下脚本:
{
  "scripts": {
    "docs:build": "vitepress build docs",
    "docs:preview": "vitepress preview docs"
  }
}
本地构建与测试
即为使用以下命令行进行本地构建:
# 开发模式启动
npm run docs:dev
# 手动构建
npm run docs:build
# 预览构建成果
npm run docs:previewVitePress会调用本地端口(port)进行静态网站构建,可以依据官网步骤自定义端口。
Github Pages
Github Pages
GitHub Pages是一项静态站点托管服务,它直接从 GitHub 上的仓库获取 index.html、HTML、CSS 和 JavaScript 文件,也可以通过构建过程运行文件,然后发布网站。
优势:
- 无更新成本: Github Pages集成在Github中,直接和代码管理绑定在一起,随着代码更新自动重新部署, 使用非常方便;
- 免费: 免费提供一个
http://username.github.io的域名,免费的静态网站服务器,很香,不需要单独购买域名; - 不需要独立服务器: 直接使用Github的服务器,不需要开发者自己的服务器;
- 无数量限制: Github Pages没有使用的数量限制,每一个Repository都可以部署为一个静态网站,理论上来说我可以构建很多个网站然后互相链接(bushi)。
缺点:
- 需要对Git有一定了解,不然会像我一样折腾很久;
- 得有一定的前端知识,不然也会折腾很久;
- MacOS好像都会出现各种各样的小问题,比如授予访问权限等,有点麻烦。
部署流程
- 首先在
Github上创建一个仓库; - 在你的主题配置文件
docs/.vitepress/config.js中,将base属性设置为你的 GitHub 仓库的名称。 如果你打算将你的站点部署到https://username.github.io/MyBlog/,那么你应该将base设置为'/MyBlog/'。 字符串格式,且始终以斜线开头和结尾; - 进入Repository的
Settings界面,选中Pages,在Build and deployment中选择source为Github Actions;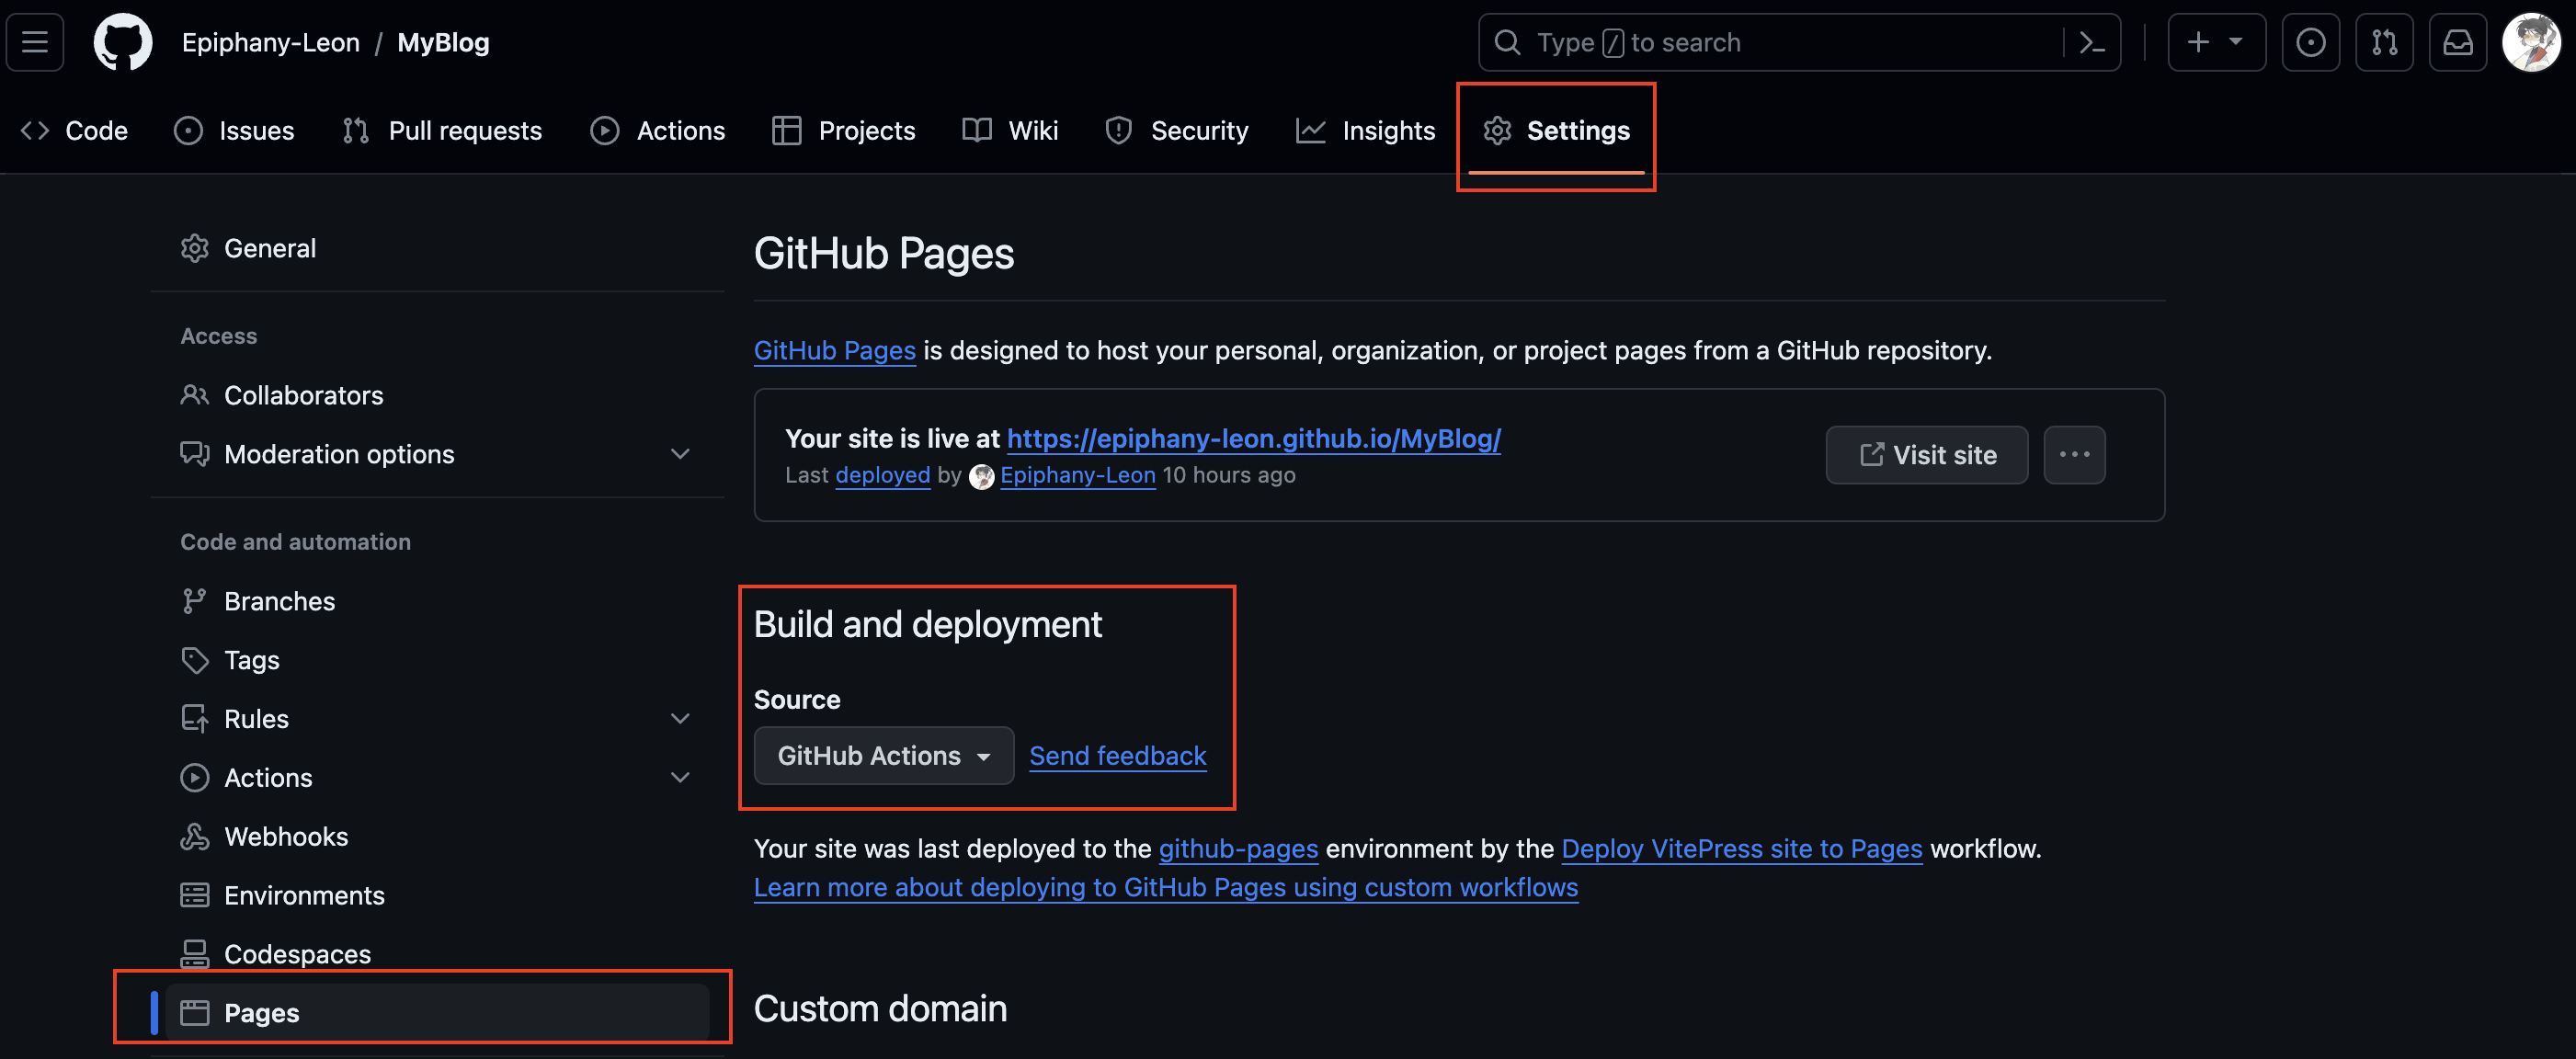
- 进入
Settings的同级目录Actions,选择创建New Workflow,创建一个名为deploy.yml的文件,代码参考官网:
# Sample workflow for building and deploying a VitePress site to GitHub Pages
#
name: Deploy VitePress site to Pages

on:
  # Runs on pushes targeting the `main` branch. Change this to `master` if you're
  # using the `master` branch as the default branch.
  push:
    branches: [main]

  # Allows you to run this workflow manually from the Actions tab
  workflow_dispatch:

# Sets permissions of the GITHUB_TOKEN to allow deployment to GitHub Pages
permissions:
  contents: read
  pages: write
  id-token: write

# Allow only one concurrent deployment, skipping runs queued between the run in-progress and latest queued.
# However, do NOT cancel in-progress runs as we want to allow these production deployments to complete.
concurrency:
  group: pages
  cancel-in-progress: false

jobs:
  # Build job
  build:
    runs-on: ubuntu-latest
    steps:
      - name: Checkout
        uses: actions/checkout@v3
        with:
          fetch-depth: 0 # Not needed if lastUpdated is not enabled
      # - uses: pnpm/action-setup@v2 # Uncomment this if you're using pnpm
      # - uses: oven-sh/setup-bun@v1 # Uncomment this if you're using Bun
      - name: Setup Node
        uses: actions/setup-node@v3
        with:
          node-version: 18
          cache: npm # or pnpm / yarn
      - name: Setup Pages
        uses: actions/configure-pages@v3
      - name: Install dependencies
        run: npm ci # or pnpm install / yarn install / bun install
      - name: Build with VitePress
        run: |
          npm run docs:build # or pnpm docs:build / yarn docs:build / bun run docs:build
          touch docs/.vitepress/dist/.nojekyll
      - name: Upload artifact
        uses: actions/upload-pages-artifact@v2
        with:
          path: docs/.vitepress/dist

  # Deployment job
  deploy:
    environment:
      name: github-pages
      url: ${{ steps.deployment.outputs.page_url }}
    needs: build
    runs-on: ubuntu-latest
    name: Deploy
    steps:
      - name: Deploy to GitHub Pages
        id: deployment
uses: actions/deploy-pages@v2- 使用以下命令行指令,将项目推送到
main分支,并等待GitHub Actions工作流程完成。推流完成应该会看到网站部署到https://<username>.github.io/[repository]/或https://<custom-domain>/。个人网站将在每次推送到main分支时自动部署。
git init
git remote add origin git@github.com:<username>/[repository].git
git branch -M master
git push -u origin master
一些可能的部署问题
- MacOS碰到的访问权限问题:
git@github.com: Permission denied (publickey).
fatal: Could not read from remote repository.

Please make sure you have the correct access rights
and the repository exists.
解决方法
**First Step: Checking if we already have the public SSH key.**

1. Open Terminal.
2. Enter `ls -al ~/.ssh` to see if existing SSH keys are present:

Check the directory list to see if you already have a public SSH key. Default public is one of the following d_dsa.pub, id_ecdsa.pub, id_ed25519.pub, id_rsa.pub.

If you don't find then go to step 2 otherwise follow step 3

**Step 2: Generating public SSH key**

1. Open Terminal.
2. Enter the following command with a valid email address that you use for github `ssh-keygen -t rsa -b 4096 -C "your_email@example.com"`
3. You will see the following in your terminal `Generating public/private rsa key pair`. When it prompts to`"Enter a file in which to save the key,"` press Enter. This accepts the default file location. When it prompts to `Enter a file in which to save the key (/Users/you/.ssh/id_rsa): [Press enter]` Just press enter again.
4. At the prompt, `"Type a secure passphrase. Enter passphrase (empty for no passphrase): [Type a passphrase]"` press enter if you don't want to `Enter same passphrase again: [Type passphrase again]` press enter again

This will generate `id_rsa.pub`

**Step 3: Adding your SSH key to the ssh-agent**

1. Interminal type `eval "$(ssh-agent -s)"`

2. Add your SSH key to the ssh-agent. If you are using an existing SSH key rather than generating a new SSH key, you'll need to replace id_rsa in the command with the name of your existing private key file. Enter this command `$ ssh-add -K ~/.ssh/id_rsa`

3. Now copy the SSH key and also add it to you github account

4. In terminal enter this command with your ssh file name `pbcopy < ~/.ssh/id_rsa.pub`This will copy the file to your clipboard Now open you github account Go to **Settings > SSH and GPG keys > New SSH key** Enter title and paste the key from clipboard and save it. Voila you're done.来源2:
1 首先用 ssh -vT git@github.com 测试一下,会去你用户目录下面找公钥文件, 有打印出下面的信息,这说明/User/用户名/.ssh/ 下面去寻找公钥文件,当前用户目录下面的确没有公钥文件
	debug1: No more authentication methods to try.
	git@github.com: Permission denied (publickey).
2 执行: cd /Users/xxx/.ssh/
3 执行: ssh-keygen -t rsa -b 4096 -C “Git 上关联的email”
	Generating public/private rsa key pair.
	Enter file in which to save the key (/Users/chenxuan/.ssh/id_rsa):
4 点击回车
	/Users/xxx/.ssh/id_rsa already exists
	Overwrite (y/n)
5 输入 y
6 生成id_rsa.pub 文件后, 执行 vi id_rsa.pub 打开文件, 复制文件内容到GitHub --> settings–>SSH and GPG Keys --> new SSH key
7 然后保存
8 重新执行 ssh -vT git@github.com , 成功提示:
	You've successfully authenticated, but GitHub does not provide shell access.

————————————————
版权声明:本文为CSDN博主「Xxxuaneer」的原创文章,遵循CC 4.0 BY-SA版权协议,转载请附上原文出处链接及本声明。
原文链接:https://blog.csdn.net/XUANEER/article/details/116170523
依靠这两篇文章,应该可以完美解决问题。
- 剩下的问题其实都源自于对Git的一无所知,稍微花点时间学习一下就可以了~
结语
惯例,有个结语。
你说,我花了这么多时间,在这个时间点,去研究和我的专业没有任何关系的东西,值得吗?
我想,是值得的。也许它跟我的专业无关,甚至这只是我的一时兴起,可是,那又怎样呢?网站完成的那一刻,我是无比高兴且满足的。写公众号也是,这是我的自娱自乐,是我的精神乐土,但我这一刻感到开心,足够了。
可是仅仅只有快乐是不会让我这么痴迷于运营公众号,探索新奇的事物的。是好奇心,是翻飞的思绪与想法。这样的探索给我带来了一成不变的生活中的可能与小确幸,即便这周很多考试,即便我的未来规划很紧张。但那又怎么样,我想做,所以我去做了。
想在枯燥的生活中找到一些失控的瞬间。